Close the Other Codex

The Table of Contents 

Of Questions Often Asked - Ultima FAQs

Quester's Notes through the Ages - The Ultima Pages
To Warriors of Destiny
Strange Sorceries - Hidden Spells in Warriors of Destiny
Of the Shrines of Virtue
Of the Crown Jewels of Britannia
Of the Shadowlords
Statistically Speaking - Weapon and Armour Stats
Of Karma and Virtue - To know thine own Worth
You are already trapped in the depths...
An Ultima V Index
Of Other Resources - Ultima V Links

Runes And Spells - Downloads

Through the Void - Main Links Page

The UDICtionary

Of Paulon Dragon - Biography?

New From the Scribe - What's New? 

 The Midi playing is 'Halls of Doom' from Ultima V. What did you expect?


Return to Warriors of Destiny

Return to Warriors of Destiny

The Depths of Doom...

For those who seek a solution for the dreaded Maze which has caused so many to fail in their Quest to rescue Lord British, this solution has been drawn by Paulon Dragon from the pages of The Other Codex.

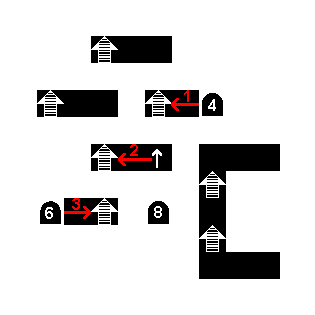
Within the maps below, drawn by use of those arcane tools called the Ultimaps True Type Fonts, created by Trigon Dragon, the following symbols are used.

Note that ALL traps are pits leading down to the next level. When a path leads to a trap, rather than past it, thou shouldst search and descend into it.

Ladder Up

Ladder Up

Ladder Down

Ladder Down

Ladder Up and Down

Ladder Both Up and Down

Pit Down

Visible Pit Down

Pit Up

Visible Pit Up

Secret Door

Secret Door

Room With Combat

Room with Combat

Room 'N'

Room 'N'

Trap

Trap


Room 1 (Level 1)

Room 1: Entrance to Doom

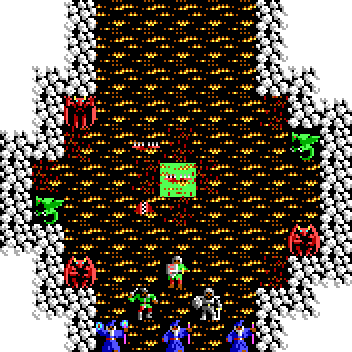
Upon thy entrance to this unhallowed hole, thou art confronted with this room, sealed with barriers which no spell may remove.

Thy only recourse is the Sceptre of Lord British which can destroy even the Ethereal Wards which doth hem thee in.

For the purpose of these directions herein, destroy the barriers to thy west and leave in that direction.


The entry chamber which thou hast vacated is upon the first of Eight levels within the Dungeon.

Thou must follow the western passage to the end, where the ladder down awaits thee.

Level 1

Map of Level 1


Level 2

Map of Level 2

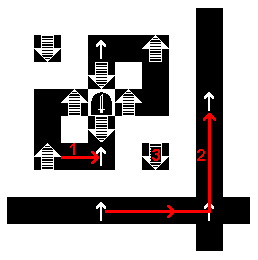
Thou now dost stand beneath a ladder in the northern part of the level. Turn to face south, but beware, as that ladder leading both up and down that thou doth see before thee is merely a lure for the foolish.

Merely move a pace to the South and turn East, and descend the ladder downwards which lies at the end of that tunnel.


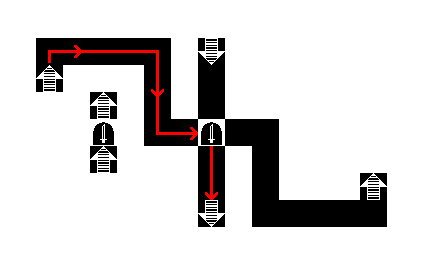
On the third level of the dungeon, thou wilt be at the westernmost ladder upwards. Thou must seek out and pass through the secret door in the eastern wall of the loop. The room at the end of the hidden passage has the ladder required to descend further into Doom.

Level 3

Map of Level 3


Room 2 (Level 3)

Room 2: Descend to Level 4

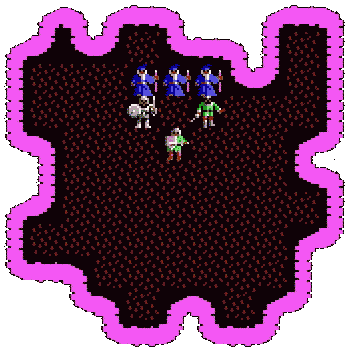
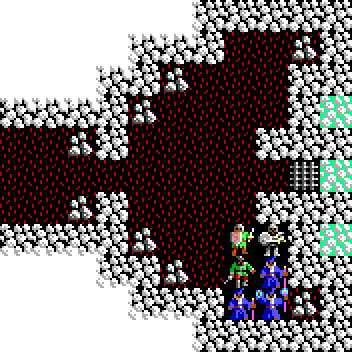
This chamber be the first wherein doth reside the Stealers of Souls of which thou wast warned by the Codex of Ultimate Wisdom. While it is simple to defeat the Daemons in physical combat, their power to charm can be fatal to the unwary. Thus it now is time for thee to don the Crown of Lord British, that it's power might shield thee from such hostile magics.


Thy first entry to this level of Doom (marked '1' upon this map) is simply into a chamber wherein stands a ladder leading both up and down. Thou must continue downwards to Level 5.

Level 4

 Map of Level 4

Level 5

Map of Level 5


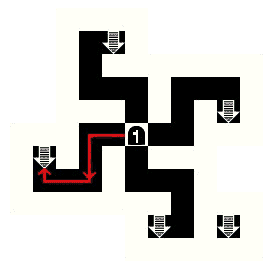
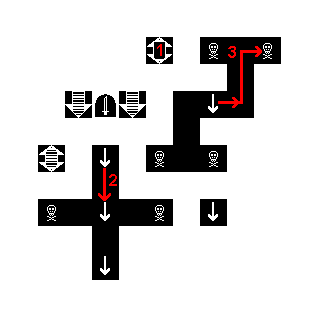
Upon entry to this level of the Dungeon Doom (marked '1' on the Map of Level 5), thou must turn east, and walk until thou art beneath the pit. Klimb up using thy Grapple, and return to Level 4.

The 4 And 5 Shuffle Hop

When back on Level 4, on the path marked '2', walk south and klimb down the pit in the center of the cross. The long intersecting passages in which thou doth now find thyself (the path marked '2' upon the Map of Level 5) may have many pits visible within the ceiling, as many as thou hast fallen through from above. The central pit above in the north-south passage is that which is required to continue thy descent into Doom.
For the last time thou hast entered Level 4 of this dungeon. Travel to the east along the path marked '3', and at the end of the passage, search the eastern alcove for the pit which doth lead back to Level 5. Descend into it, to the point denoted as '3' upon the depiction of Level 5, then descend once more, unto Level 6.

After the retracing of thy steps through the maze above, thy journey through this level will seem trivial. Follow the marked path, pausing only to battle the oceanic monstrosities within the chamber in thine route, then descend the ladder unto Level 7.

Level 6

Map of Level 6


Level 7

Map of Level 7

Upon thy entry into the passages of Level 7, thou shouldst avoid the temptation to descend lower upon the ladder. Instead thou needth enter the room to thy north, and engage the foes therein.

In the center of this chamber lies a ladder, concealed beneath the body of one of thy foes, marked upon the image below.

Room 3: Descend to Level 8

The ladder leads downwards to Room 4, on the map of Level 8.


Within this level lies the prison chamber of Lord British.Yet you cannot enter it through doors, but only through a pit from above.

Thus you must again seek a route through a twisty maze of passages and pits, all alike.

Level 8

Map of Level 8


Room 4 (Level 8)

Room 4: Crossing Bridges

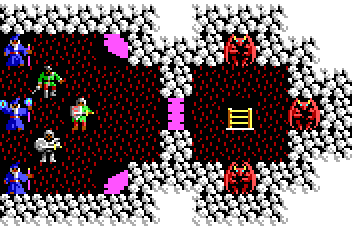
This chamber must be crossed in order to continue upon thy quest. Strike at the highlighted wall in the northwest corner with a missile, and be astounded as the bridge of hope appears.

Beware however, for no miracle comes without a price in such a place as Doom...


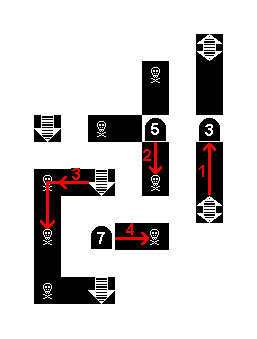
When thou hast passed the room above, thou wilt be upon the portion of trail marked '1' upon the map of Level 8. Simply klimb the ladder, and enter into Room 5, upon Level 7 once more.

Step upon the grate, and press firmly upon the marked wall to thy east. Walk to the alcove to the north, and likewise press upon the eastern wall. Finally, walk south and press upon the marked wall in the east for the last time.

Journey forth from this chamber through the southern exit.

Room 5 (Level 7)

Room 5: from Level 8


Thou are now upon the portion of thy journey through Level 7 marked '2'. Search for then descend into the pit to reach part '2' of thine travails upon Level 8. Klimb up the ladder once more to Level 7, unto the 3rd leg of the marathon maze searching upon that level. Seek ye the center pit of the three concealed within the floor, for that will lead you down to Room 6, upon Level 8 yet again.

Room 6 (Level 8)

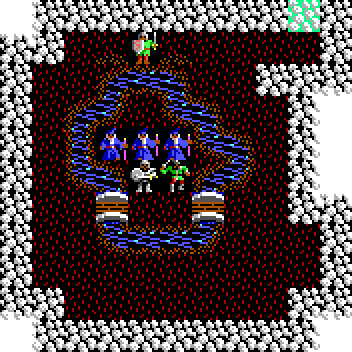
Within this Chamber, thine most urgent need it the elimination of the sharks which be prolific within the waters of this tiny lake.

Whenupon thy foes are removed, seek ye the exit to the east. The passage north doth be a deception, so seek the spot where the Avatar is pictures, then enter the eastern alcove and press firmly upon the marked northern wall, that the eastern exit may be revealed.


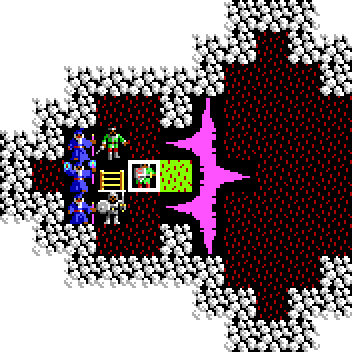
Thou art past the Lake of Sharks, and onto the last (3rd) portion of thy journey though Level 8. The chamber which thou doth enter by ladder is filled with thy foes, yet thine skills should be sufficient to deal them justice. Be warned however, that the marked ground doth conceal a terrible trap, descending the floor to the east into a pit of molten lava. When beset by foes this may tip the scales against thee.

Leave to the East, and search the passageway for the final pit. Below lies that which the world hath lost.

Room Seven (Level 7)

Room Seven: Last Battle


The Final Puzzle

Inside the Trap


 Return to the Top


Return to Warriors of Destiny

Return to Warriors of Destiny


Return to Questions Often Asked

Return to Of Questions Often Asked.